


Introduction:
In this project we are using raspberry pi, Led, Lcd,
dht22 sensor and bmp sensor. In this we are taking all the sensor like
temperature, humidity, pressure, sea level pressure and altitude data and
displaying on the Lcd and also storing in Cloud and Database.
Installation
of All Software:
1)
Raspbian OS:
This is the recommended os for raspberry pi. You can
also installed other OS from third party. Raspbian OS is debian based OS. We
can install it from noobs installer. you can Download here
Link: https://www.raspberrypi.org/downloads/noobs/
2)
Python idle: This is the software we get in raspbian
os. For this project we have used python script.
3)
Putty: we are using putty for remote access of Raspberry Pi.you
can Download here
Link: https://www.chiark.greenend.org.uk/~sgtatham/putty/latest.html
4)
Win32DiskImager: This software is used to burn Raspbian Os
on SD Card. you can Download here
Link: https://sourceforge.net/projects/win32diskimager/
5)
SDFormatter: This software is used to format memory
card. you can Download here
Link: https://www.sdcard.org/downloads/formatter_4/
6)
Installation of LAMP Server and PHPMYADMIN:
First of all let us clear one thing that we are using
LAMP Server for this project. In case if you don't know what is LAMP, it is an
abbreviation of Linux, Apache, MySQL and PHP. So if you have windows or may be
MAC then you have to install WAMP and MAMP respectively.
So
what we are explaining that is only for LAMP server: and here are the steps for
installing LAMP server
1. Install Apache sudo apt-get install apache2
2. Install MySQL: sudo apt-get install mysql-server
3. Install PHP: sudo apt-get install php5
libapache2-mod-php5
4. Restart Server: sudo /etc/init.d/apache2 restart
5. Check Apache http://localhost/
if you install these steps successfully then you will
get the apche page like the image above Here we are using PHPMYADMIN that is
the web interface of MySQL so for that you have to install that also and the
command for that is:
sudo apt-get install phpmyadmin
Hardware
Used:
1) Raspberry pi
2) Lcd 16x2
3) DHT 22
4) BMP180
5) Led
6) Pot
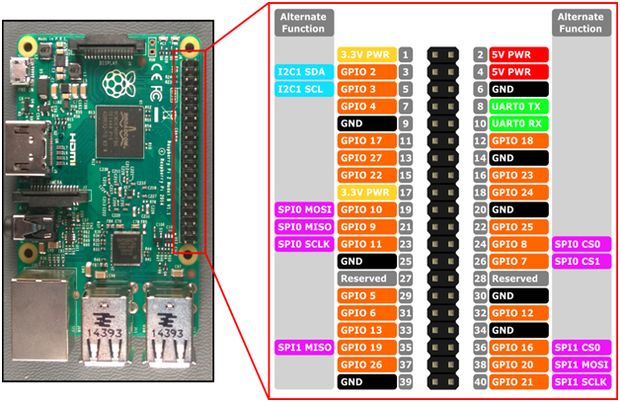
1. Raspberry Pi:
This is the latest version of raspberry pi. In this we have inbuilt Bluetooth and wi-fi, unlike previously we have to use Wi-Fi dongle in one of its usb port. There are total 40 pins in RPI3. Of the 40 pins, 26 are GPIO pins and the others are power or ground pins (plus two ID EEPROM pins.) There are 4 USB Port and 1 Ethernet slot, one HDMI port, 1 audio output port and 1 micro usb port and also many other things you can see the diagram on right side. And also we have one micro sd card slot wherein we have to installed the recommended Operating system on micro sd card. There are two ways to interact with your raspberry pi. Either you can interact directly through HDMI port by connecting HDMI to VGA cable, and keyboard and mouse or else you can interact from any system through SSH(Secure Shell). (For example in windows you can interact from putty ssh.) Figure is given below.
2) Lcd 16x2:
We come across
LCD displays everywhere around us. Computers, calculators, television sets,
mobile phones, digital watches use some kind of display to display the time. An
LCD is an electronic display module which uses liquid crystal to produce a
visible image. The 16×2 LCD display is a very basic module commonly used in
DIYs and circuits. The 16×2 translates o a display 16 characters per line in 2
such lines. In this LCD each character is displayed in a 5×7 pixel matrix.

3) DHT 22 Sensor:
The DHT22 is a basic, low-cost digital temperature and humidity sensor.
It uses a capacitive humidity sensor and a thermistor to measure the surrounding air, and spits out a digital signal on the data pin (no analog input pins needed). Its fairly simple to use, but requires careful timing to grab data. The only real downside of this sensor is you can only get new data from it once every 2 seconds, so when using our library, sensor readings can be up to 2 seconds old.
It uses a capacitive humidity sensor and a thermistor to measure the surrounding air, and spits out a digital signal on the data pin (no analog input pins needed). Its fairly simple to use, but requires careful timing to grab data. The only real downside of this sensor is you can only get new data from it once every 2 seconds, so when using our library, sensor readings can be up to 2 seconds old.

4) BMP180 Sensor:
This precision sensor from Bosch is the best low-cost sensing solution for measuring barometric pressure and temperature. Because pressure changes with altitude you can also use it as an altimeter! The sensor is soldered onto a PCB with a 3.3V regulator, I2C level shifter and pull-up resistors on the I2C pins. The BMP180 is the next-generation of sensors from Bosch, and replaces the BMP085.The XCLR pin is not physically present on the BMP180 so if you need to know that data is ready you will need to query the I2C bus. This board is 5V compliant - a 3.3V regulator and a i2c level shifter circuit is included so you can use this sensor safely with 5V logic and power.

Important
command codes for LCD:
Hex Code
Command to LCD
01 Clear
display screen
02 Return home
04 Decrement cursor (shift cursor to left)
04 Decrement cursor (shift cursor to left)
06 Increment
cursor (shift cursor to right)
05 Shift
display right
07 Shift
display left
08 Display off,
cursor off
0A Display off,
cursor on
0C Display on,
cursor off
0E Display on,
cursor blinking
0F Display on,
cursor blinking
10 Shift cursor
position to left
14 Shift cursor
position to right
18 Shift the
entire display to the left
1C Shift the
entire display to the right
80 Force cursor
to beginning ( 1st line)
C0 Force cursor
to beginning ( 2nd line)
38 2 lines and
5×7 matrix
How to Create Dashboard on MQTT:
In this step
I'm going explain you about how we can create Mqtt Dashboard. So for that we
are using Adafruit Mqtt. The UI of Adafruit IOis very user-friendly. So Step by
step I'm going to explain you about this. So you just follow the process. So Here are the steps:
1. First you
need to create account in io.adafruit.com
2. You will get
the page like above, so fill these details, now when you will sign in you will
get the page like above
3. In this page
in the top right corner you will get some icons. From this you can click on
'Create a new block'.
So from here
you can create toggle button or gauge or other things. So you can see creating
blocks are very simple. Now one more important thing is 'Key' icon so click on
that, and you will see that some random alphanumeric number you will get. That
is your Adafruit IO Key this is very important note down that, this key you
need to use on your python script. You can regenerate your key by clicking on
REGENERATE AIO KEY.


0 comments:
Post a Comment
if you have any doubt please let me know